Steps To Adjust 4 Types of Bike Brakes| Enhance Your Ride Power
Cruising on your bike through scenic routes is a joyous experience, but what happens when your brakes put a damper on the thrill? Properly adjusted bike brakes are the key to a safe and enjoyable ride. Whether you’re a cycling enthusiast or just someone who loves a leisurely pedal, understanding how to fine-tune your brakes is a skill worth mastering.
In this guide, we’ll unveil the secrets to achieving that perfect balance between stopping power and a smooth ride, ensuring your biking adventures are nothing short of exhilarating. Say goodbye to squeaky stops and wobbly descents – it’s time to take control and ride with confidence!
What is the best position for bike brakes?
The optimal position for bike brakes is one that ensures efficient stopping power while maintaining a comfortable and ergonomic riding experience. Generally, bike brakes should be positioned symmetrically on both the front and rear wheels, with the brake levers easily accessible from the handlebars. The brake levers should be comfortably within reach of your fingers without requiring you to stretch or strain. This allows for quick and intuitive braking response when needed, enhancing safety and control during your rides.
In terms of brake pad positioning, they should be aligned to contact the rim’s braking surface evenly. This prevents unnecessary friction and ensures consistent and effective braking performance. The brake pads should be positioned a few millimeters away from the rim when not engaged, preventing unwanted rubbing while still allowing for rapid engagement when the brake lever is squeezed.

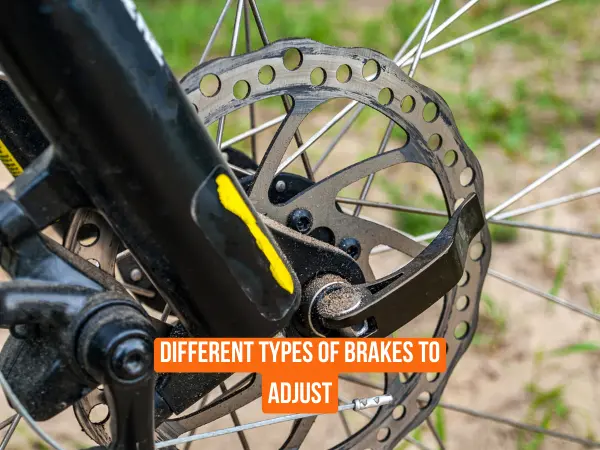
Different types of brakes to adjust
- Caliper brake system
- Disk brake system
- V-brake system
- Hydraulic brake system
Steps To Adjust 4 Types of Bike Brakes
Tools needed
| Tools Needed |
|---|
| Allen Wrench |
| Adjustable Wrench |
| Screwdriver |
| Clean Cloth or Rag |
1. Adjust disc brake
Step 1: Check Your Wheel Before diving into caliper adjustments, make sure your wheel is properly seated in the dropout. A loose wheel can lead to rubbing and misalignment.
Step 2: Center the Caliper Start by loosening the caliper mounting bolts just enough so that the caliper can move freely. Squeeze the brake lever to engage the pads against the rotor. Gradually tighten the bolts while holding the brake lever to ensure the caliper is centered over the rotor. Check both sides to ensure equal spacing between the pads and the rotor.
Step 3: Align the Caliper. Inspect the gap between the brake pads and the rotor. If you notice one pad is closer than the other, you’ll need to adjust the caliper position. Push or pull the caliper until both pads are equidistant from the rotor. Make small adjustments and recheck until both pads are aligned.
Step 4: Test for Rubbing Spin the wheel and observe the gap between the rotor and each pad. If you hear or feel rubbing, it’s time to fine-tune. Some disc brakes have an adjustment knob – turn it to move the caliper slightly in or out until the rubbing stops. If your brakes don’t have this feature, you must manually adjust the caliper-positioning.
Step 5: Fine-tune manually. If rubbing persists, use an Allen wrench to loosen the caliper mounting bolts slightly. Hold the brake lever to engage the pads, then retighten the bolts. This should automatically align the caliper.
Step 6: Check Lever Feel After adjustments, ensure that the brake lever feels firm when squeezed. If it feels spongy or doesn’t engage smoothly, you might need to bleed the brake system to remove air bubbles.
Step 7: Test Ride Take your bike for a test ride in a safe environment. Gradually increase your speed and apply the brakes to ensure they respond smoothly and without rubbing. If you encounter any issues, recheck your adjustments.
2. Hydraulic brakes
Step 1: Check Brake Lever and Pad Wear Start by examining your brake levers and pads. Ensure that the brake lever feels firm and responsive when squeezed. Next, inspect the brake pads for wear. If they’re worn down close to the indicator lines, it’s time to replace them.
Step 2: Verify Rotor Alignment Check if the brake rotor is properly aligned within the caliper. Look for any signs of rubbing against the pads. If there’s rubbing, gently adjust the caliper bolts until the rotor is centered within the caliper.
Step 3: Adjust Lever Reach Many hydraulic brake levers have adjustable reach. This allows you to set the distance between the lever and the handlebar to your preference. Use an Allen wrench to adjust the reach if needed. Ensure that the lever is comfortably positioned for your fingers.
Step 4: Check Brake Lever Feel Squeeze the brake lever slowly and then firmly. It should offer consistent resistance and engage smoothly. If it feels spongy or too firm, you may need to bleed the brakes to remove air bubbles.
Step 5: Bleeding the Brakes (If Necessary) If you notice a spongy feel or reduced braking power, bleeding the brakes might be required. This process removes air from the hydraulic system. Refer to your brake manufacturer’s guidelines for the specific bleeding procedure, as it can vary based on the brand and model.
Step 6: Pad Clearance Adjustment Ensure that there’s a small gap between the brake pads and the rotor. If the pads are too close, the rotor might drag and cause unnecessary wear. If too far, you might experience reduced braking power. Use any included brake pad spacers to achieve the optimal pad clearance.
Step 7: Fine-Tuning the Bite Point (Optional) Some hydraulic brakes allow you to adjust the bite point—the point at which the pads start to engage the rotor. Refer to your brake’s manual for guidance on adjusting the bite point to your preference.
Step 8: Test and Refine After making adjustments, take your bike for a short ride to test the brakes. Pay attention to the braking feel and stopping power. If necessary, make further adjustments until you’re satisfied with their performance.

3. V-brake system
Step 1: Gather Your Tools Before diving into the adjustment process, gather a few essential tools:
- Allen wrenches (usually 5mm and 6mm)
- Adjustable wrench
- Screwdriver (flat or Phillips, depending on your brake model)
- Clean cloth or rag
Step 2: Assess Brake Pads Begin by checking the condition of your brake pads. Ensure they’re not excessively worn or damaged. If they are, replace them before adjusting.
Step 3: Center the Brake Arms Loosen the bolt on the brake arm that attaches it to the frame or fork. Squeeze the brake lever and center the brake arms around the rim. Once centered, tighten the bolt securely.
Step 4: Set Pad Clearance Position the brake pads so they sit a few millimeters away from the rim’s surface. This prevents rubbing while still allowing efficient braking. To adjust the pad clearance, use the pad’s adjustment screw or washer, if your brake model has them.
Step 5: Balance the Pads Check if both brake pads contact the rim simultaneously when you squeeze the brake lever. If one pad contacts the rim before the other, adjust the balance screw located on the brake arm until both pads engage evenly.
Step 6: Adjust Cable Tension If your brakes feel too loose or too tight, adjust the cable tension. Locate the barrel adjuster on the brake lever or cable housing. Turn it clockwise to tighten the cable and increase braking force, or counterclockwise to loosen the cable.
Step 7: Test and Fine-Tune Take your bike for a test ride in a safe area. Test your brakes at different speeds and strengths to ensure they respond smoothly and effectively. Listen for any rubbing or unusual noises.
Step 8: Check Lever Reach Ensure your brake lever isn’t too far from the handlebar grip, making it uncomfortable to reach. Most brake levers have an adjustment screw or dial to change the lever’s position.
Step 9: Fine-Tune as Needed If you encounter any issues during your test ride, return to the adjustment points and make further tweaks until you’re satisfied with the brake performance.
Step 10: Regular Maintenance Remember, periodic brake maintenance is crucial. Keep an eye on pad wear cable integrity, and adjust as needed to maintain consistent and reliable braking.
You May Also Like: How To Change Brake Calipers In A Car?
4. Caliper Brake Pads on Bikes
Step 1: Check the brake pads.
As the components that come into contact with the brake rotor during braking, brake pads are vital for a car’s brake system.
It is important to check the brake pads regularly to ensure they are in good condition and not too worn. If the brake pads are worn, they must be replaced to ensure safe braking.
Step 2: Evaluate the grip of the brake pads on the rim.
If the brake pads are not in contact with the rim, the bike cannot stop. This can be dangerous as the bike may continue to move, and the rider may not be able to control it. It is important to check that the brake pads are properly seated on the rim before riding.
Step 3: Center the brake pads.
Replace your worn-out brake pads when they’re worn out. Brake pad grease should always be used when installing new brake pads. When installing the brake pads in the caliper, apply a thin layer of grease to their backs.
Step 4: Check the bike’s brake cables.
The brake cables are an important part of your bike and are responsible for stopping your bike. You should check the brake cables regularly to ensure they are in good shape. They may need to be replaced if they are in bad shape.
Step 5: Adjust the brake cables.
If the brake cables are too tight or loose, you must adjust them. Loosen the cable adjustment screw on the brake caliper with a wrench. Turn the screw counterclockwise to loosen it. Slide the brake cable up or down until it is tight. Tighten the cable adjustment screw with the wrench. Turn the screw clockwise to tighten it.
Step 6: Evaluate the calipers.
Inspect the calipers for leaks, wear, and damage. The brake pads are also inspected for wear and damage. If repairs are needed, the appropriate parts are ordered, and the repairs are made.
Step 7: Adjust the calipers.
Adjust the calipers by turning the screws on the end of the calipers. If you turn the screws clockwise, the calipers will be tighter and smaller. If you turn the screws counterclockwise, the calipers will become looser and larger.
Step 8: Test the bike brake system.
You need to test the bike’s braking system by riding the bike and applying the brake. You should feel a gradual braking force when you use the brake. If you do not feel gradual braking force, you may need to adjust the brake.
More maintenance tips for adjusting bike brakes:
Certainly! Here are some additional maintenance tips for adjusting bike brakes to ensure optimal performance and safety:
- Regular Inspection: Make it a habit to inspect your brake pads, cables, and brake system components regularly. Look for signs of wear, damage, or rust. Address any issues promptly to prevent further problems.
- Clean the Brake Pads and Rims: Clean brake pads and the rim’s braking surface periodically to remove dirt, debris, and brake pad residue. A clean surface enhances braking efficiency and reduces the risk of squeaking.
- Lubrication: Apply a small amount of lubricant to pivot points and moving parts of the brake system. However, avoid getting any lubricant on the braking surface, as it can compromise braking effectiveness.
- Brake Pad Replacement: Replace brake pads when they are worn down to their wear indicators or have a thin pad material left. Worn brake pads can negatively impact braking performance and even damage your rims.
- Cable Care: Ensure that brake cables are properly tensioned and not frayed. Lubricate cables occasionally to prevent rust and ensure smooth movement.
- Alignment Check: Periodically check the alignment of your brake pads. If they are not hitting the rim evenly or are rubbing against the tire, readjust them to ensure consistent braking and to prevent unnecessary wear.
- Brake Lever Reach: Make sure your brake levers are positioned comfortably within reach of your fingers. Adjust the lever position to suit your hand size and riding style.
- Test Your Brakes: After adjustments, take your bike for a test ride in a safe area. Test your brakes at different speeds and strengths to ensure they respond smoothly and effectively.
- Seek Professional Help: If you’re unsure about adjusting brakes or encounter complex issues, it’s best to consult a professional bike mechanic. They have the expertise to diagnose and resolve more intricate problems.
- Educate Yourself: Familiarize yourself with your bike’s specific brake system and components. This knowledge will empower you to perform routine maintenance and adjustments with confidence.
By following these maintenance tips, you’ll not only ensure your bike’s braking system is functioning at its best but also contribute to a safer and more enjoyable riding experience.
Frequently Asked Questions
What is the reason for adjusting the brakes?
Adjusting the brakes is a necessary procedure that must be done to ensure that your car’s brakes are working properly. Adjusting the brakes ensures that the brake pads make proper contact with the brake disks to stop the vehicle.
What tools are needed to adjust the brakes?
You will need a wrench, a screwdriver, and a hammer to adjust the brakes. The wrench is used to loosen and tighten the bolts on the caliper, the screwdriver is used to adjust the brake pads, and the hammer is used to drive the brake pads back in.
What problems can occur if the brakes are not adjusted properly?
One possible problem with improper brake adjustment is that the brakes will not work properly, leading to a car accident. Another potential problem is that the brake pads wear out faster than they should, leading to an accident.
What are the signs that my brakes need adjusting?
If you need to apply pressure to the brake pedal to stop the car, your brakes may need to be adjusted. If your brakes squeal when you use them, they may need to be adjusted. Take your car to a mechanic to have it checked.
What factors affect brake adjustment?
A few factors can affect brake adjustment, including brake pad wear, rotor wear, and caliper piston position. When these factors change, the brake pads will be less able to make contact with the rotor and produce friction. This can cause the brakes to feel “squishy” or “spongy” and require adjustment to restore proper function.
Can I adjust the brakes myself?
Yes, you can adjust the brakes yourself; however, it is recommended that you take your car to a professional garage for inspection before making any repairs.
Conclusion
Adjusting the brakes on a bicycle is a necessary skill for any cyclist. Not only does it help you avoid accidents, but it also helps you maintain your safety and confidence on the road. Whether you are learning how to adjust your brakes for the first time or you have been adjusting them for years, it’s important to remember that brakes should be adjusted for safety and comfort.
